|
|
VIII. The Process from launching to landing
Develop your own routine or ritual for KAP. Without some order to what you do, you're more likely to forget a step or to leave an item behind. Here are six suggestions:
|
|
|
 |
|
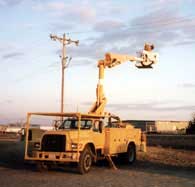
A. Visualize. Picture what you'll be doing before you actually begin. Having more than once watched my camera bounce against the ground, I much prefer flying over grass than water or concrete. And having had to call the local power company to retrieve my kite from its power lines, I completely avoid kite-eating trees and power lines.
In making sure I have enough space to land a kite as well as launch it, it's especially valuable to be able to measure distances. To help do this, I carry a Tasco Lasersite Rangefinder 800. It comes in handing to make sure I have enough space in front of me to walk down my kite.
As you look around, also notice whether the wind is steady and strong enough to keep your camera up. Finally, plan to invest one hour and one roll of film each time you take aerial photos.
|
|
|
|
| |
|
B. Anchor. Once I've looked around and decided to launch my kite, the first thing I do is screw an anchor into the ground. I don't want to have my hands full with a launched camera and then try to figure out how to secure my line.
|
|
|
|
 |
|
C. Select the right kite. As you begin kiting, you'll be surprised how much the wind varies. Sometimes it's stable and other times it seems to be constantly changing direction and strength. It's frustrating when the wind's only strong enough to lift your kite, but not your camera. On the other hand, a hard gust on a windy day can pull a reel out of your hands. For that reason, it's important to match the size of the kite to the size of the wind--big kites for weak winds and little kites for strong winds. I've come to gauge roughly the feel of the wind from experience. I've not found a satisfactory inexpensive wind meter to do this, nor do I feel like investing about $100 for a good one.
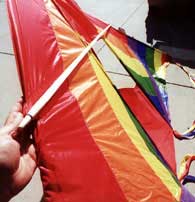
I keep my kites in storage bags and I wrap a rubber band around the tails. As I attach the tails to the kite, I put that rubber band around my wrist so I have it handy when I take them off again.
The last thing I do as I assemble my DC is to insert its horizontal cross spar, and the first thing I do on landing is to remove it. This piece is what gives the kite its lift. Without it, the kite just flaps in the breeze.
After you launch your kite, watch it for a few minutes before attaching your camera. Make sure there's enough consistent lift to keep your camera off the ground.
|
|
|
|
 |
|
D. Mount and test camera. The wind close to the ground is generally more turbulent. I've seen my kite come down from about 50 feet just as fast as it went up, and it's no fun when your camera's attached. For that reason, I usually let out at least 100 feet of line before attaching my camera. I then put a lark's head knot in the line and secure it to my anchor. I leave the camera screwed onto its mount so all I have to do is secure the mount itself to the line. I then make sure three things are turned "on": the R.C. transmitter, its receiver on the camera mount, and the camera itself. I then take one test shot to make sure everything is working. It's frustrating to bring your camera back down after a half-hour, only to discover no pictures were taken because you've forgotten to turn something "on." Finally, make sure the camera is pointing in the direction you want it when it gets to its destination.
|
|
|
|
| |
|
E. Enjoy. I've found no greater adrenaline rush than watching my camera swing away at the end of my kite line. When your camera gets out to about where you want it to be, wait until the camera is swinging the least before tripping the shutter. Because it's difficult to be sure that the camera is seeing what you want, I recommend taking a variety of shots from different locations. You can do this by changing the amount of line you let out and the location from which you're holding the kite line. Then if everything's cooperating, use a lark's head knot to fasten your line to your anchor, get out your chair and drink, and enjoy.
|
|
|
|
|
|
F. Retrieve your rig. Bring your rig down by walking down the line. The first thing to do once your kite has landed is to take out its horizontal spar. This will keep it from trying to take off again. Next take off the tails and wrap then with the rubber band from your wrist. Then as you return with your kite, pick up your camera mount. As you put away your camera, never forget to turn off three things: the transmitter, the receiver, and the camera. Finally reel in line and pick up the anchor. Before you leave, check the grounds to make sure you've left nothing behind.
|
|
|
|
|
|
|